Won't Turn On?
Don't Write It Off.
From "dead" units with no lights to intermittent shutdowns and clicking ballasts. We repair the internal Power Supply and Mainboard logic at the component level, saving you the cost of a replacement.

Board-Level Engineering
We replace faulty capacitors, MOSFETs, and fuses on the board—we don't just swap expensive parts.
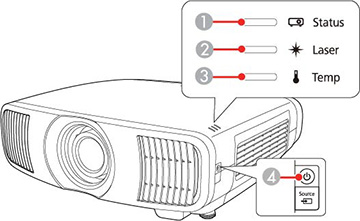
Identifying the Power Fault
Totally Dead
No lights, no fan spin, no response to the remote or power button. This indicates a primary failure in the Power Supply Unit (PSU) or an internal fuse blow.
Clicking Sound
You hear a "click-click-click" sound as it tries to start, but the lamp never lights. This is the Ballast Unit failing to generate the ignition voltage required to strike the bulb.
Short Run & Cut Out
Runs fine for 5-10 minutes, then shuts down unexpectedly. This is often a Mainboard Component failure (like a capacitor) or a thermal sensor cutting power falsely.
The "Power Chain" Explained
A projector doesn't just have "a power supply." It has a complex chain. Mains power enters the PSU (Power Supply Unit), which converts AC to DC voltages (380V for the lamp, 12V/5V for the motherboard).
The Mainboard then sends a signal to the Ballast, which boosts voltage to over 5,000V for a split second to ignite the mercury vapour in the lamp. If any link in this chain breaks—a dried capacitor in the PSU, a shorted MOSFET on the mainboard, or a weak ignition coil in the ballast—the system triggers a "Protection Mode" shutdown.
The Economic Reality: Manufacturer replacement boards often exceed £400, rendering repairs via standard channels uneconomical. Our component-level engineering restores your existing board. While this involves skilled diagnostic time and logistics, it remains the most cost-effective solution for high-specification projectors compared to the high capital cost of a new machine.
Our Electronics Repair Protocol
Precision diagnosis using oscilloscopes and thermal imaging.
Voltage Rail Testing
We don't guess. We test the 12V, 5V, and 3.3V power rails under load to ensure the PSU is delivering stable current without "ripple" or voltage drops.
Component Replacement
We use high-grade Japanese capacitors (Rubycon/Nichicon) and industrial MOSFETs to replace failed components, often exceeding the original specification for longevity.
Ballast Reconditioning
If the lamp won't strike, we rebuild the high-voltage ignition stage of the ballast, restoring the ability to light the bulb reliably on the first try.
Soak Test
The repaired unit is cycle-tested (turned on and off repeatedly) and run for 24 hours to ensure thermal expansion doesn't trigger intermittent power faults.
Common Questions
Is it just the fuse in the plug?
I put a new bulb in, but it still won't light up. Why?
Why does it work when cold but fail when warm?
Get Your Power Back
Don't risk electrical safety or further damage. Let our engineers diagnose the fault for free.
Book Free Assessment